
Along time ago on a Facebook page far far away…….
How to shoot episode IV. A New Hope -for a decent Astro-shot
(digitally remastered with 10 more lines and new pic).
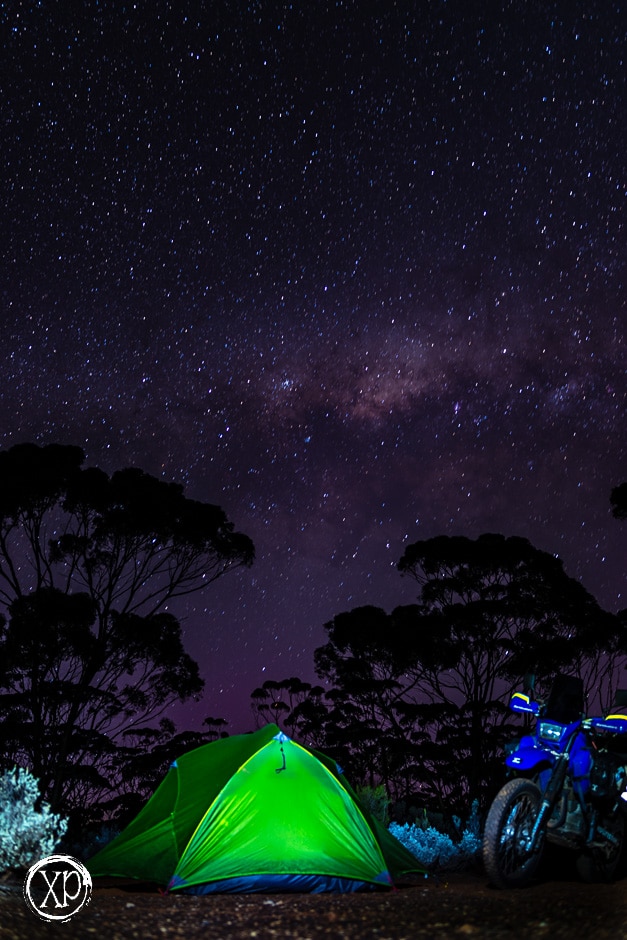
I wrote a post on how to take the attached shot… Well i have been ask to put some how to’s up and I promised that i would. However this up coming exhibition is taking a lot of time so I thought instead of not actually doing it I would cheat and just re-post the original. Digitally remastered to discuss post possessing.
Nightshot 101.
Okay My one reader and several Spam Bots, these photos seem to be the latest thing surrounded by Black Magic. But they are SO easy. Here is how:
You will need
– A camera (oh shock horror NO way!!! :-D) or a Phone with manual long exposure features or an app.
– A tri-pod / camera mount or similar (some very stable rocks will work, but may limit your angles :-D).
– A remote control or inbuilt timer
– A location away from Light-pollution (e.g. far away from a town/city/ or even a house)
– A clear night (cus if you can’t see the stars you can photograph em… duh)
– And something else to shoot in the foreground… like a tent or bike or big rock..
(yup that’s it)
Step one:
Wait till VERY dark.
Put your camera on Manual or Open your phone’s camera app,
– Now look through the camera modes and see if there’s one named “manual” or “pro”. If not head to app store of your choice and get a long exposure app (as there are so many from this point on I will assume your phone has manual features).
Leave the Iso on something like 400, (yes you can use huge isos but lower ones means better and more time to paint).
Paint what is this paint stuff???.. patience grass hopper…
Step two:
Mount Camera on tripod.
Set up the camera to take the photos either by remote or delayed timer. (this makes sure you don’t shake the camera… technically you don’t need it but trust me your pictures will be better..)
Focus on the objects (not the stars)
Step three.
Set Aperture to as wide as possible (so smallest number) this will give you the most light in the camera.. OR you can put it anywhere upto but below 11 for a greater depth of focus. (you wont be touching this again)
Setting Shutter speed (aka F-stop) Now this is where you will have to PLAY.. start with 15 seconds (my normal is 30-40secomds).
Take the photo…look at it… Then increase time until the stars shine. (Testing is over! Throw those picts in the bin).
Step Four (this is the part people don’t wan to you know…)
Once you have your stars as bright as you want.. you take your photo again but this time take your torch and quickly “Paint with light” the tent/ bike/ big rock (whatever) for about 2-3 seconds MAX, while your photo is being taken.
By Paint I mean run the light beam over the surface of the object like you are spray painting.
(the new stuff):
Okay now go home, Open Lightroom (or your preferred post software) and import your favourites.
Every photographer postprocesses.. if they say they don’t they lie. I don’t add or remove anything (except dust) but will crop/colour correct/ tone control/ sharpen/ blah blah balh.. basic stuff..
Follow your normal work flow or copy mine.
- Lens correction – click both,
- Colour profile: for this I chose Vivid.
- White balance.. I find that my LED torch comes out like a fluorescent colour so that is what I corrected for.
- Tone: no changes to Exposure /contrast/ shadows or blacks, but a bit of a plus tweak to the highlights and whites to clean them up.
- Plus to the vibrance and saturation to make it pop!
- And in this case no change to the sharpening or noise
- No other changes..
That’s It! Have play and show me how you did.